Thursday, 16 May 2013

Sam's Quilt

Happy first birthday Sam! The birthday boy has received his birthday quilt which means I can share the finished article with you all. It's a good job he's into colour as this quilt has turned out a bit on the bright side! Primary colours, what was I thinking?! Oh who am I trying to kid - I love garish. Fortunately, it's a hit with a one year old - his Mum says that he enjoys pointing at the patterns. How cute is that?

Star Block Quilt Retro Rocket Rascals

I decided to go for the star block design by Cluck Cluck Sew. I've made this design once before for my Stars and Scraps Quilt, but I thought the stars would work well with the sputnik fabric (continuing the spacey theme, see what I did there). If you want to know more about the fabrics used for the quilt top, see my last post. It's the back of the quilt that I'm uber-excited about though - it's quite possibly the cutest quilt back ever.

Riley Blake Designs Peak Hour Kellie Wulfsohn Quilt

I know, just how good is that? I could swoon over that fabric all day. It's Riley Blake Designs DC2836, Peak Hour by Kellie Wulfsohn for Don't Look Now. I bought it at The Viking Loom in York if you're in the area and desperate to get your hands on some! I had planned to go for something quite plain as the backing but as soon as I saw this I knew it would be perfect. I really like how it features a small amount of each of the colours from the quilt top, so ties in perfectly.

Star Block Quilt Retro Rocket Rascals

The binding was actually some leftover from my Emma's Christmas Stocking. It was just the perfect shade of green and has little stars all over. The quilting was simply stitched in the ditch and I also quilted some diagonals to add a bit more interest.
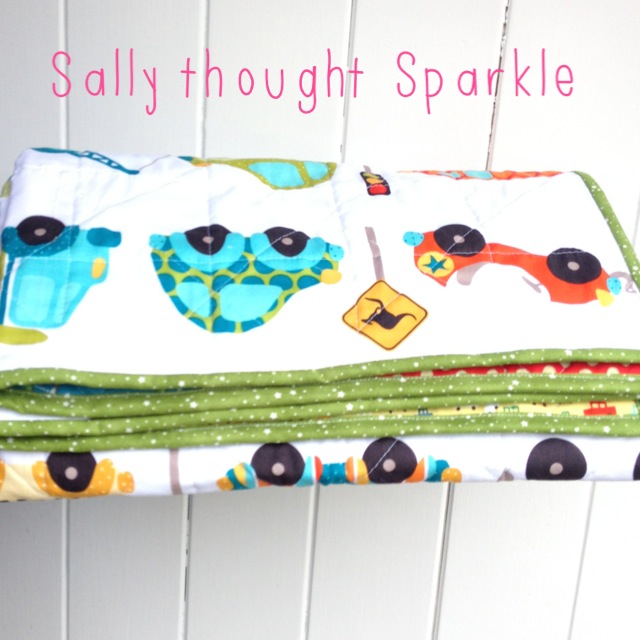
Sally thought Sparkle Quilt

I'm so happy with this quilt. If you're visiting over from Crazy Mom Quilts, finish it up Friday please comment below, I'd love to hear what you think.


Monday, 13 May 2013

Fab Fabric

I've been very busy this week rustling up a quilt, before I share the finished quilt with you I thought I'd share the fabric with you. A couple of weekends ago my sister Anna (Minnie loves) came to York and we tried out a lovely little cafĂ© that has opened in York. It's called Me and Mrs Fisher and I thoroughly recommend it for crafty types. What is so great about it (apart from the delicious cheese scones) is that it also has a small but perfectly formed haberdashery upstairs where they also hold regular sewing and crafting workshops. I KNOW food and crafts - what a great combo! The whole place really has a crafty, friendly vibe. Anyway, Anna and I had a mooch around the haberdashery and  both fell in love with this wonderful sputnik fabric.

Retro Rocket Rascals by Michael Miller

It's a Michael Miller fabric and has the best name - Retro Rocket Rascals! The trouble was neither of us could think who would like a quilt made of this fabric so we left it. Coincidentally, only a few hours later my other sister, Vicky, phoned me and suggested I make a quilt as a first birthday present for a friend's son. Ting! Inspiration struck and I knew I had to buy the Rocket Rascals! Such hardship.

I went back to Me and Mrs Fisher and not only bought the Retro Rocket Rascals, but also a second Michael Miller fabric. This one is called Toot Toot (loving these fabric names). I have since noticed that Allison Harris of Cluck Cluck Sew (and one of my favourite quilters) has used this fabric in her new book, so it must be good!

Michael Miller Toot Toot

I knew I wanted a third fabric, but just couldn't find anything that really matched. Anna came to the rescue when she found this lovely red and lime splodgey fabric from John Lewis in Sheffield. It's part of the Katherine's Wheel collection and is designed by Nel Whatmore for Free Spirit Westminster Fibers.

Katherine's Wheel Nel Whatmore Free Spirit Westminster Fibers

I'll blog about the finished quilt as soon as I hear it has arrived safely. The birthday boy's mum sometimes read this blog and I don't want to ruin the surprise. Ooh I hope they like it!


Friday, 10 May 2013

Another Guest Blog

Do you remember the evening I spent with sewing with my sister (Vicky) cutting out fabric for a little dress for her daughter? Well she has finished the project and has kindly written a guest blog about it! The pattern she followed is Simplicity 1924. Over to Vicky...
 
Well the little dress is complete and I must admit I am rather pleased with it. It is absolutely not perfect, there are plenty of mistakes but even so I think the finished article looks great. I hope you agree?
 
Simplicity 1924
 
In order to try to stop you making some of the same mistakes I did, I will give you a little overview:
1) The scalloped piping is a nightmare, it just doesn't flex well enough. After several attempts (I think at least 4), I ended up snipping all the seam allowances and handstitching the piping in place. This then kept it in position well enough to be able to machine stitch.

Simplicity 1924
2) If you look closely you may notice the ties and shoulder straps are sewn on the wrong way round. My advice is to take care here, unfortunately for me I didn't notice this error until I had moved on too far to be able to unpick it.


3) I made an error with the lower piped bodice section in that I should have turned the raw edges inwards and made a nice seam with the raw bit hidden, instead I just folded the fabric over so it isn't as neat as it should be. Luckily it is hidden away behind the bodice section and I will have to hope it doesn't fray.
 
 
I really enjoyed making this dress and it was very quick to put together once the fabric had been cut and I had finally worked out the bodice piping. A lovely little project, I would definitely recommend having a go.

Vicky (thought Vejazzle)

Thanks for that Vicky, the finished dress is really beautiful. Love, love, love the horse riding photo! What are you making next?

I'm linking up to Crazy Mom Quilts, Finish it Up Friday. Normal quilting will resume shortly!

Thursday, 9 May 2013

Wonderful Window

I have finally finished leading up me second stained glass window. It has taken me an age because I kept missing my Wednesday evening lesson because of work - boo. It has been worth the wait though as the colours in the finished window really pop. Can we all just ignore the bit of matchstick that I failed to notice when taking this next photo? Oh, and it's upside down, hmm.

Stained Glass Window
I've actually already soldered the joints on one side. If I get the remaining side soldered by next Wednesday I'll be onto the cementing. I just can't wait to have my two windows installed now.


Monday, 6 May 2013

Primary Colours

I've been doing a whole lot of cutting and stacking today! That is all.

Saturday, 4 May 2013

May Day

It's May Day weekend, which means three whole days off work. Yippee! What better way to spend it than with my sister and her family? It also meant I could give my niece, Emma, the little dress that I've finished making for her. She has learnt to walk this week so here she is posing (or struggling to balance?) in her new polka dot frock.

McCalls M6494


McCalls M6494
 
Emma was so cute when I handed the dress over to her, she just kept giving it cuddles, so sweet. I hope that means she likes it! I must admit, I'm really pleased with the way the dress turned out, especially the gorgeous ruffles around the arm and neck holes. The overlapping front is very cute too. For the back I chose bright green buttons to match the green fabric I'd picked for the ruffled hem.
 
 
I think I've mentioned (but will do so again for those interested) the pattern is by McCalls, pattern number M6494. I can highly recommend the pattern as it's easy and it doesn't take too long to make up the dress. The only place where I got totally lost was the 'continuous lap' part (turns out it's where the button band is on the skirt, who knew?), but this YouTube video really helped me out.


I've had such a lovely day!

I'm linking up to Crazy Mom Quilts -  Finish it up Friday. Sorry it's not a quilt this time!

Monday, 29 April 2013

Clematis Cake

My good friend and colleague is retiring tomorrow so I've tasked myself with making her a retirement cake. She is a keen gardener and her computer wallpaper is this beautiful clematis she grew in her garden (I sneakily took a photo of her computer screen when she wasn't looking - ha). Soooo, that's the theme of the cake...

Clematis
 
I'll admit here to being well out of my sugarpaste comfort zone with this project, I usually only do very simple cake designs. Luckily, I found this great sugarpaste clematis tutorial online and bought all my supplies from Imaginative Icing in York.
 
In the end I made five flowers consisting of seven petals each and wired the individual petals together with florists tape. I also made some loose petals - they were handy for filling in any gaps and also for hiding some of the bodges in the icing on the sides of the cake.
 
Clematis Cake
 
To get the right colours I used a combo of three craft dusting powders - Foliage Green, Pink and Dusky Pink. I used a paint brush to dab on the colours - Green for the centres, Dusky Pink for the tips and Pink for the petal centres and edges. You can be quite rough at this stage as the next step is to brush on pearl lustre powder and that really seems to blend the colours and make the petals look more natural. The stamens were bought. -  I wired a few together to create the flower centres and coloured them green with the dusting powder.
 
 
Happy Retirement Yvonne, I hope you like the cake!

Sally
xxx